
Bandit靶场:wargames_bandit
Level 0 → Level 13
Level 0
Level Goal
The goal of this level is for you to log into the game using SSH. The host to which you need to connect is bandit.labs.overthewire.org, on port 2220. The username is bandit0 and the password is bandit0. Once logged in, go to the Level 1 page to find out how to beat Level 1.
Commands you may need to solve this level
ssh
这个关卡的目标是让你使用SSH登录游戏。您需要连接的主机是bandit.labs.overthewire.org,端口为2220。用户名是bandit0,密码是bandit0。登录后,转到1级页面,了解如何击败1级。
解题过程:
使用ssh工具连接 bandit.labs.overthewire.org 的 2220端口,用户名密码都是bandit0
ssh bandit.labs.overthewire.org:2220
Level 0→Level 1
Level Goal
The password for the next level is stored in a file called readme located in the home directory. Use this password to log into bandit1 using SSH. Whenever you find a password for a level, use SSH (on port 2220) to log into that level and continue the game.
Commands you may need to solve this level
ls , cd , cat , file , du , find
下一级的密码存储在主目录中的名为 readme 的文件中。使用此密码进行记录 使用 SSH 进入 bandit1。每当您找到关卡的密码时, 使用 SSH(在端口 2220 上)登录该关卡并继续游戏。
解题过程:
bandit0@bandit:~$ ls
readme
bandit0@bandit:~$ cat readme
NH2SXQwcBdpmTEzi3bvBHMM9H66vVXjL
bandit0@bandit:~$
Level 1 → Level 2
Level Goal
The password for the next level is stored in a file called - located in the home directory
Commands you may need to solve this level
ls , cd , cat , file , du , find
下一级的密码存储在主目录中名为-的文件中。
解题过程:
貌似和前一关一样,但是 - 有特殊含义,直接使用 cat - 会出现错误。 我们可以写完整的目录表明它是一个文件。继续cat读取文件即可。
bandit1@bandit:~$ ls
-
bandit1@bandit:~$ cat ./-
rRGizSaX8Mk1RTb1CNQoXTcYZWU6lgzi
bandit1@bandit:~$
Level 2 → Level 3
Level Goal
The password for the next level is stored in a file called spaces in this filename located in the home directory
Commands you may need to solve this level
ls , cd , cat , file , du , find
下一级的密码存储在一个名为spaces的文件中,该文件名位于主目录中。
解题过程:
与前面不同的是文件名中包含空格。如果直接使用cat+文件名会在第一个空格处中止。我们可以用双引号表示完整文件名。或者使用用转义字符\来转义空格
bandit2@bandit:~$ ls
spaces in this filename
bandit2@bandit:~$ cat "spaces in this filename"
aBZ0W5EmUfAf7kHTQeOwd8bauFJ2lAiG
bandit2@bandit:~$ cat spaces\ in\ this\ filename
aBZ0W5EmUfAf7kHTQeOwd8bauFJ2lAiG
bandit2@bandit:~$
Level 3 → Level 4
Level Goal
The password for the next level is stored in a hidden file in the inhere directory.
Commands you may need to solve this level
ls , cd , cat , file , du , find
下一级别的密码存储在inhere目录中的一个隐藏文件中。
解题过程:
这题依旧很简单,我们首先进入 inhere 文件夹,然后打开里面的隐藏文件。
bandit3@bandit:~$ ls
inhere
bandit3@bandit:~$ cd inhere/
bandit3@bandit:~/inhere$ ls
bandit3@bandit:~/inhere$ ll
total 12
drwxr-xr-x 2 root    root    4096 Oct  5  2023 ./
drwxr-xr-x 3 root    root    4096 Oct  5  2023 ../
-rw-r----- 1 bandit4 bandit3   33 Oct  5  2023 .hidden
bandit3@bandit:~/inhere$ cat .hidden
2EW7BBsr6aMMoJ2HjW067dm8EgX26xNe
Level 4 → Level 5
Level Goal
The password for the next level is stored in the only human-readable file in the inhere directory. Tip: if your terminal is messed up, try the “reset” command.
Commands you may need to solve this level
ls , cd , cat , file , du , find
下一级的密码存储在inhere目录中唯一可读的文件中。提示:如果你的终端出了问题,试试“reset”命令。
解题过程:
进入到inhere目录后,可以看到很多文件,有一个文件藏着密码,用file命令查看一下文件,我们可以看到,只有一个文件是ASCII编码的,用cat来查看它
bandit4@bandit:~$ ls
inhere
bandit4@bandit:~$ cd inhere/
bandit4@bandit:~/inhere$ ls
-file00  -file01  -file02  -file03  -file04  -file05  -file06  -file07  -file08  -file09
bandit4@bandit:~/inhere$ file ./*
./-file00: data
./-file01: data
./-file02: data
./-file03: data
./-file04: data
./-file05: data
./-file06: data
./-file07: ASCII text
./-file08: data
./-file09: data
bandit4@bandit:~/inhere$ cat ./-file07
lrIWWI6bB37kxfiCQZqUdOIYfr6eEeqR
Level 5 → Level 6
Level Goal
The password for the next level is stored in a file somewhere under the inhere directory and has all of the following properties:
human-readable
1033 bytes in size
not executable
Commands you may need to solve this level
ls , cd , cat , file , du , find
提示密码在 inhere 目录下的某个文件中,包含以下属性:
- 人类可读
- 大小为 1033 字节
- 不可执行
find常用命令
-name pattern:按文件名查找,支持使用通配符*和?。-type type:按文件类型查找,可以是f(普通文件)、d(目录)、l(符号链接)等。-size [+-]size[cwbkMG]:按文件大小查找,支持使用+或-表示大于或小于指定大小,单位可以是c(字节)、w(字数)、b(块数)、k(KB)、M(MB)或G(GB)。-mtime days:按修改时间查找,支持使用+或-表示在指定天数前或后,days是一个整数表示天数。-user username:按文件所有者查找。-group groupname:按文件所属组查找。
解题过程:
进入inhere文件夹,找到人类可读的大小为1033的不可执行文件。
bandit5@bandit:~$ ls
inhere
bandit5@bandit:~$ cd inhere/
bandit5@bandit:~/inhere$ ls
maybehere00  maybehere02  maybehere04  maybehere06  maybehere08  maybehere10  maybehere12  maybehere14  maybehere16  maybehere18
maybehere01  maybehere03  maybehere05  maybehere07  maybehere09  maybehere11  maybehere13  maybehere15  maybehere17  maybehere19
bandit5@bandit:~/inhere$ find -size 1033c
./maybehere07/.file2
bandit5@bandit:~/inhere$ cat ./maybehere07/.file2
P4L4vucdmLnm8I7Vl7jG1ApGSfjYKqJU
Level 6 → Level 7
Level Goal
The password for the next level is stored somewhere on the server and has all of the following properties:
owned by user bandit7
owned by group bandit6
33 bytes in size
Commands you may need to solve this level
ls , cd , cat , file , du , find , grep
提示密码在服务器某个位置,具有以下属性:
- 属于用户 bandit7
- 属于用户组 bandit6
- 大小为 33 个字节
解题过程:
这里依然使用 find 命令
bandit6@bandit:~$ find /  -size 33c -user bandit7 -group bandit6 2> /dev/null        #使用2>将错误流信息重定向到/dev/null,可以忽略错误信息。
/var/lib/dpkg/info/bandit7.password
bandit6@bandit:~$ cat /var/lib/dpkg/info/bandit7.password
z7WtoNQU2XfjmMtWA8u5rN4vzqu4v99S
Level 7 → Level 8
Level Goal
The password for the next level is stored in the file data.txt next to the word millionth
Commands you may need to solve this level
man, grep, sort, uniq, strings, base64, tr, tar, gzip, bzip2, xxd
提示密码存储在文件 data.txt 中,在单词 millionth 旁。
解题过程:
打开文件发现内容太多,人工筛选太累,直接grep搜索。
友情提示:千万不要使用命令:cat data.txt
bandit7@bandit:~$ cat data.txt | grep millionth
millionth	TESKZC0XvTetK0S9xNwm25STk5iWrBvP
Level 8 → Level 9
Level Goal
The password for the next level is stored in the file data.txt and is the only line of text that occurs only once
Commands you may need to solve this level
grep, sort, uniq, strings, base64, tr, tar, gzip, bzip2, xxd
提示密码存储在文件 data.txt 中,仅出现一次的文本字符串。
uniq 命令,用于检查及删除文本文件中重复出现的行列,一般与 sort 命令结合使用。
-c 检查文件并删除文件中重复出现的行,并在行首显示该行重复出现的次数。
-u 仅显示出一次的行列。
sort 命令,用于将文本文件内容加以排序。
解题过程:
bandit8@bandit:~$ ls
data.txt
bandit8@bandit:~$ sort data.txt | uniq -u
EN632PlfYiZbn3PhVK3XOGSlNInNE00t
Level 9→Level 10
Level Goal
The password for the next level is stored in the file data.txt in one of the few human-readable strings, preceded by several ‘=’ characters.
Commands you may need to solve this level
grep, sort, uniq, strings, base64, tr, tar, gzip, bzip2, xxd
下一级的密码存储在文件中,data.txt在为数不多的人类可读字符串之一中,前面有几个“=” 字符。
解题过程:
使用 cat 会出现一堆乱码,我们需要把我们可读的字符串提取出来。
用 strings 命令,再查找带有“=”的行:最长的那串应该就是密码
bandit9@bandit:~$ ls
data.txt
bandit9@bandit:~$ strings ./data.txt | grep "="
=2""L(
x]T========== theG)"
========== passwordk^
Y=xW
t%=q
========== is
4=}D3
{1\=
FC&=z
=Y!m
	$/2`)=Y
4_Q=\
MO=(
?=|J
WX=DA
{TbJ;=l
[=lI
========== G7w8LIi6J3kTb8A7j9LgrywtEUlyyp6s
>8=6
=r=_
=uea
zl=4
Level 10 → Level 11
Level Goal
The password for the next level is stored in the file data.txt, which contains base64 encoded data
Commands you may need to solve this level
grep, sort, uniq, strings, base64, tr, tar, gzip, bzip2, xxd
下一级的密码存储在文件data.txt中, 其中包含 base64 编码数据
解题过程:
这一关非常简单,用base64解码data.txt就行
bandit10@bandit:~$ ls
data.txt
bandit10@bandit:~$ cat data.txt
VGhlIHBhc3N3b3JkIGlzIDZ6UGV6aUxkUjJSS05kTllGTmI2blZDS3pwaGxYSEJNCg==
bandit10@bandit:~$ base64 -d data.txt
The password is 6zPeziLdR2RKNdNYFNb6nVCKzphlXHBM
Level 11 → Level 12
Level Goal
The password for the next level is stored in the file data.txt, where all lowercase (a-z) and uppercase (A-Z) letters have been rotated by 13 positions
Commands you may need to solve this level
grep, sort, uniq, strings, base64, tr, tar, gzip, bzip2, xxd
提示密码在 data.txt 中,所有字母都旋转了 13 个位置。也就是说,a 相当于 n。这关考察是经典的ROT13加密
解题过程:
耐心品味题干,字母旋转了13个位置。意思是右移了13个,A代表N,以此类推。一共26个字母,相当于前13个和后13个调换位置
使用命令 tr用于转换或删除文件中的字符
bandit11@bandit:~$ ls
data.txt
bandit11@bandit:~$ cat data.txt
Gur cnffjbeq vf WIAOOSFzMjXXBC0KoSKBbJ8puQm5lIEi
bandit11@bandit:~$ cat data.txt | tr 'a-zA-Z' 'n-za-mN-ZA-M'
The password is JVNBBFSmZwKKOP0XbFXOoW8chDz5yVRv
Level 12 → Level 13
Level Goal
The password for the next level is stored in the file data.txt, which is a hexdump of a file that has been repeatedly compressed. For this level it may be useful to create a directory under /tmp in which you can work using mkdir. For example: mkdir /tmp/myname123. Then copy the datafile using cp, and rename it using mv (read the manpages!)
Commands you may need to solve this level
grep, sort, uniq, strings, base64, tr, tar, gzip, bzip2, xxd, mkdir, cp, mv, file
下一级的密码存储在文件data.txt中, 这是重复压缩的文件的十六进制转储。 对于此级别,在 /tmp 下创建一个目录可能很有用 您可以使用 mkdir 工作。例如:mkdir /tmp/myname123。 然后使用 cp 复制数据文件,并使用 mv 重命名它
解题过程:
1、先打开看看,发现是一堆16进制文件
bandit12@bandit:~$ cat data.txt
2、按照提示,我们先去tmp目录创建一个临时目录,然后我们把文件复制过去
bandit12@bandit:~$ mkdir /tmp/my
bandit12@bandit:~$ cp data.txt /tmp/my
bandit12@bandit:~$ cd /tmp/my
3、使用xxd将其转换成二进制文件,并查看文件类型
xxd 命令,二进制和十六进制之间转换。
bandit12@bandit:/tmp/my$ ls
data.txt
bandit12@bandit:/tmp/my$ xxd -r data.txt > data
bandit12@bandit:/tmp/my$ file data
data: gzip compressed data, was "data2.bin", last modified: Thu Oct  5 06:19:20 2023, max compression, from Unix, original size modulo 2^32 573
4、发现是gzip压缩包,我们修改后缀名为gz并解压
bandit12@bandit:/tmp/my$ mv data data.gz
bandit12@bandit:/tmp/my$ gzip -d data.gz
5、继续使用file 查看文件类型,发现解压出来的data是一个bzip2压缩文件
bandit12@bandit:/tmp/my$ file data
data: bzip2 compressed data, block size = 900k
6、重复刚才的操作,重命名解压
bandit12@bandit:/tmp/my$ mv data data.bz2
bandit12@bandit:/tmp/my$ bzip2 -d data.bz2
bandit12@bandit:/tmp/my$ ls
data  data.txt
bandit12@bandit:/tmp/my$ file data
data: gzip compressed data, was "data4.bin", last modified: Thu Oct  5 06:19:20 2023, max compression, from Unix, original size modulo 2^32 20480发现解压出来的data是一个bzip2压缩文件
7、继续查看 data 的文件类型,发现是个gzip压缩文件,修改后缀解压
andit12@bandit:/tmp/my$ mv data data.gz
bandit12@bandit:/tmp/my$ gzip -d data.gz
bandit12@bandit:/tmp/my$ file data
data: POSIX tar archive (GNU)
8、解压出来继续file命令查看,发现又是个tar压缩文件!!!继续重复刚才操作(要有耐心。。。)
bandit12@bandit:/tmp/my$ mv data.tr data.tar
bandit12@bandit:/tmp/my$ tar xvf data.tar
data5.bin

bandit12@bandit:/tmp/my$ file data5.bin
data5.bin: POSIX tar archive (GNU)
bandit12@bandit:/tmp/my$ mv data5.bin data.tar
bandit12@bandit:/tmp/my$ tar xvf data.tar
data6.bin

bandit12@bandit:/tmp/my$ file data6.bin
data6.bin: bzip2 compressed data, block size = 900k
bandit12@bandit:/tmp/my$ mv data6.bin data.bz2
bandit12@bandit:/tmp/my$ bzip2 -d data.bz2

bandit12@bandit:/tmp/my$ file data
data: POSIX tar archive (GNU)
bandit12@bandit:/tmp/my$ mv data data.tar
bandit12@bandit:/tmp/my$ tar xvf data.tar
data8.bin

bandit12@bandit:/tmp/my$ file data8.bin
data8.bin: gzip compressed data, was "data9.bin", last modified: Thu Oct  5 06:19:20 2023, max compression, from Unix, original size modulo 2^32 4
bandit12@bandit:/tmp/my$ mv data8.bin data.gz
bandit12@bandit:/tmp/my$ gzip -d data.gz

bandit12@bandit:/tmp/my$ file data
data: ASCII text
bandit12@bandit:/tmp/my$ cat data
The password is wbWdlBxEir4CaE8LaPhauuOo6pwRmrDw
Level 13 - Level 26
Level 13 → Level 14
Level Goal
The password for the next level is stored in /etc/bandit_pass/bandit14 and can only be read by user bandit14. For this level, you don’t get the next password, but you get a private SSH key that can be used to log into the next level. Note: localhost is a hostname that refers to the machine you are working on
Commands you may need to solve this level
ssh, telnet, nc, openssl, s_client, nmap
下一级的密码存储在 /etc/bandit_pass/bandit14 中,只能由用户读取 土匪14。对于此级别,您不会获得下一个密码,但您 获取可用于登录下一关的私有 SSH 密钥。注意:localhost 是引用计算机的主机名 你正在处理
解题过程:
我们使用 ssh -i 使用私钥进行登录bandit14:
ssh -i 指定私钥 -p 指定端口
bandit13@bandit:~$ ls
sshkey.private
bandit13@bandit:~$ ssh -i ./sshkey.private bandit14@localhost -p2220
登录成功直接cat查看密码
bandit14@bandit:~$ cat /etc/bandit_pass/bandit14
fGrHPx402xGC7U7rXKDaxiWFTOiF0ENq
Level 14 → Level 15
Level Goal
The password for the next level can be retrieved by submitting the password of the current level to port 30000 on localhost.
Commands you may need to solve this level
ssh, telnet, nc, openssl, s_client, nmap
可以通过提交 当前级别的密码设置为 localhost 上的端口 30000。
解题过程:
提示提交当前密码到 localhost 的 30000 端口获取下一个密码。
用nc发送bandit14的密码就可以获得密码
bandit14@bandit:~$ ls
bandit14@bandit:~$ nc localhost 30000
fGrHPx402xGC7U7rXKDaxiWFTOiF0ENq
Correct!
jN2kgmIXJ6fShzhT2avhotn4Zcka6tnt
也可以使用telnet来做这道题
bandit14@bandit:~$ telnet localhost 30000
Trying 127.0.0.1...
Connected to localhost.
Escape character is '^]'.
fGrHPx402xGC7U7rXKDaxiWFTOiF0ENq
Correct!
jN2kgmIXJ6fShzhT2avhotn4Zcka6tnt

Connection closed by foreign host.
Level 15 → Level 16
Level Goal
The password for the next level can be retrieved by submitting the password of the current level to port 30001 on localhost using SSL encryption.
Helpful note: Getting “HEARTBEATING” and “Read R BLOCK”? Use -ign_eof and read the “CONNECTED COMMANDS” section in the manpage. Next to ‘R’ and ‘Q’, the ‘B’ command also works in this version of that command…
Commands you may need to solve this level
ssh, telnet, nc, openssl, s_client, nmap
提示使用SSL加密将当前级别的密码提交到 localhost 上的端口 30001来检索下一级别的密码。
解题过程:
根据提示,然后查阅了相关资料,我们这里使用 openssl 进行连接。发送当前关卡的密码就可以获得16的密码
OpenSSL Cookbook - Testing with OpenSSL
openssl 可以实现:秘钥证书管理、对称加密和非对称加密 。
bandit15@bandit:~$ openssl s_client -connect localhost:30001
---(省略了服务器信息)----
jN2kgmIXJ6fShzhT2avhotn4Zcka6tnt
Correct!
JQttfApK4SeyHwDlI9SXGR50qclOAil1
Level 16 → Level 17
Level Goal
The credentials for the next level can be retrieved by submitting the password of the current level to a port on localhost in the range 31000 to 32000. First find out which of these ports have a server listening on them. Then find out which of those speak SSL and which don’t. There is only 1 server that will give the next credentials, the others will simply send back to you whatever you send to it.
Commands you may need to solve this level
ssh, telnet, nc, openssl, s_client, nmap
下一级别的凭证可以通过将当前级别的密码提交到本地主机上范围在31000到32000之间的端口来检索。首先找出这些端口中哪些有服务器在监听。然后找出哪些端口支持SSL,哪些不支持。只有一个服务器会提供下一个凭证,其他的只会简单地将你发送的内容原样返回给你。
解题过程:
1、用nmap可以扫描,nmap是非常好用的端口扫描器,这里nmap可以用很多种参数来实现扫描功能,-A -sV等,都可以,玩家可以自己尝试多种扫描参数。
bandit16@bandit:~$ nmap  localhost -p 31000-32000 -sV
Starting Nmap 7.80 ( https://nmap.org ) at 2024-04-19 09:34 UTC
Nmap scan report for localhost (127.0.0.1)
Host is up (0.00015s latency).
Not shown: 996 closed ports
PORT      STATE SERVICE     VERSION
31046/tcp open  echo
31518/tcp open  ssl/echo
31691/tcp open  echo
31790/tcp open  ssl/unknown
31960/tcp open  echo
1 service unrecognized despite returning data. If you know the service/version, please submit the following fingerprint at https://nmap.org/cgi-bin/submit.cgi?new-service :
SF-Port31790-TCP:V=7.80%T=SSL%I=7%D=4/19%Time=66223AC3%P=x86_64-pc-linux-g
SF:nu%r(GenericLines,31,"Wrong!\x20Please\x20enter\x20the\x20correct\x20cu
SF:rrent\x20password\n")%r(GetRequest,31,"Wrong!\x20Please\x20enter\x20the
SF:\x20correct\x20current\x20password\n")%r(HTTPOptions,31,"Wrong!\x20Plea
SF:se\x20enter\x20the\x20correct\x20current\x20password\n")%r(RTSPRequest,
SF:31,"Wrong!\x20Please\x20enter\x20the\x20correct\x20current\x20password\
SF:n")%r(Help,31,"Wrong!\x20Please\x20enter\x20the\x20correct\x20current\x
SF:20password\n")%r(SSLSessionReq,31,"Wrong!\x20Please\x20enter\x20the\x20
SF:correct\x20current\x20password\n")%r(TerminalServerCookie,31,"Wrong!\x2
SF:0Please\x20enter\x20the\x20correct\x20current\x20password\n")%r(TLSSess
SF:ionReq,31,"Wrong!\x20Please\x20enter\x20the\x20correct\x20current\x20pa
SF:ssword\n")%r(Kerberos,31,"Wrong!\x20Please\x20enter\x20the\x20correct\x
SF:20current\x20password\n")%r(FourOhFourRequest,31,"Wrong!\x20Please\x20e
SF:nter\x20the\x20correct\x20current\x20password\n")%r(LPDString,31,"Wrong
SF:!\x20Please\x20enter\x20the\x20correct\x20current\x20password\n")%r(LDA
SF:PSearchReq,31,"Wrong!\x20Please\x20enter\x20the\x20correct\x20current\x
SF:20password\n")%r(SIPOptions,31,"Wrong!\x20Please\x20enter\x20the\x20cor
SF:rect\x20current\x20password\n");

Service detection performed. Please report any incorrect results at https://nmap.org/submit/ .
Nmap done: 1 IP address (1 host up) scanned in 98.31 seconds
2、扫描结果显示了5个开放的端口,分别是31046、31518、31691、31790和31960。这些端口的状态都是"open",服务名称为"echo"或"ssl/unknown",表示运行在这些端口上的服务可能是简单的回显服务(echo)或者SSL加密的未知服务。
31790端口,我们连接试一下,输入当前关卡密码,返回ssh_privatekey。
bandit16@bandit:~$ openssl s_client -connect localhost:31790
-----(省略了服务器信息)-----
JQttfApK4SeyHwDlI9SXGR50qclOAil1
Correct!
-----BEGIN RSA PRIVATE KEY-----
MIIEogIBAAKCAQEAvmOkuifmMg6HL2YPIOjon6iWfbp7c3jx34YkYWqUH57SUdyJ
imZzeyGC0gtZPGujUSxiJSWI/oTqexh+cAMTSMlOJf7+BrJObArnxd9Y7YT2bRPQ
Ja6Lzb558YW3FZl87ORiO+rW4LCDCNd2lUvLE/GL2GWyuKN0K5iCd5TbtJzEkQTu
DSt2mcNn4rhAL+JFr56o4T6z8WWAW18BR6yGrMq7Q/kALHYW3OekePQAzL0VUYbW
JGTi65CxbCnzc/w4+mqQyvmzpWtMAzJTzAzQxNbkR2MBGySxDLrjg0LWN6sK7wNX
x0YVztz/zbIkPjfkU1jHS+9EbVNj+D1XFOJuaQIDAQABAoIBABagpxpM1aoLWfvD
KHcj10nqcoBc4oE11aFYQwik7xfW+24pRNuDE6SFthOar69jp5RlLwD1NhPx3iBl
J9nOM8OJ0VToum43UOS8YxF8WwhXriYGnc1sskbwpXOUDc9uX4+UESzH22P29ovd
d8WErY0gPxun8pbJLmxkAtWNhpMvfe0050vk9TL5wqbu9AlbssgTcCXkMQnPw9nC
YNN6DDP2lbcBrvgT9YCNL6C+ZKufD52yOQ9qOkwFTEQpjtF4uNtJom+asvlpmS8A
vLY9r60wYSvmZhNqBUrj7lyCtXMIu1kkd4w7F77k+DjHoAXyxcUp1DGL51sOmama
+TOWWgECgYEA8JtPxP0GRJ+IQkX262jM3dEIkza8ky5moIwUqYdsx0NxHgRRhORT
8c8hAuRBb2G82so8vUHk/fur85OEfc9TncnCY2crpoqsghifKLxrLgtT+qDpfZnx
SatLdt8GfQ85yA7hnWWJ2MxF3NaeSDm75Lsm+tBbAiyc9P2jGRNtMSkCgYEAypHd
HCctNi/FwjulhttFx/rHYKhLidZDFYeiE/v45bN4yFm8x7R/b0iE7KaszX+Exdvt
SghaTdcG0Knyw1bpJVyusavPzpaJMjdJ6tcFhVAbAjm7enCIvGCSx+X3l5SiWg0A
R57hJglezIiVjv3aGwHwvlZvtszK6zV6oXFAu0ECgYAbjo46T4hyP5tJi93V5HDi
Ttiek7xRVxUl+iU7rWkGAXFpMLFteQEsRr7PJ/lemmEY5eTDAFMLy9FL2m9oQWCg
R8VdwSk8r9FGLS+9aKcV5PI/WEKlwgXinB3OhYimtiG2Cg5JCqIZFHxD6MjEGOiu
L8ktHMPvodBwNsSBULpG0QKBgBAplTfC1HOnWiMGOU3KPwYWt0O6CdTkmJOmL8Ni
blh9elyZ9FsGxsgtRBXRsqXuz7wtsQAgLHxbdLq/ZJQ7YfzOKU4ZxEnabvXnvWkU
YOdjHdSOoKvDQNWu6ucyLRAWFuISeXw9a/9p7ftpxm0TSgyvmfLF2MIAEwyzRqaM
77pBAoGAMmjmIJdjp+Ez8duyn3ieo36yrttF5NSsJLAbxFpdlc1gvtGCWW+9Cq0b
dxviW8+TFVEBl1O4f7HVm6EpTscdDxU+bCXWkfjuRb7Dy9GOtt9JPsX8MBTakzh3
vBgsyi/sN3RqRBcGU40fOoZyfAMT8s1m/uYv52O6IgeuZ/ujbjY=
-----END RSA PRIVATE KEY-----

closed
3、拷贝下来私钥,我们在/tmp目录下新建一个目录,然后把私钥写到一个文件里面,这里一定要注意,要把文件的权限修改一下,用chmod 600修改权限,不然无法使用ssh -i 登录。
bandit16@bandit:~$ cd /tmp/
bandit16@bandit:/tmp$ mkdir 11
bandit16@bandit:/tmp$ cd 11
bandit16@bandit:/tmp/11$ vim key   // 把私钥复制进来
bandit16@bandit:/tmp/11$ chmod 600 key
bandit16@bandit:/tmp/11$ ll
total 408
drwxrwxr-x   2 bandit16 bandit16   4096 Apr 19 12:23 ./
drwxrwx-wt 429 root     root     405504 Apr 19 12:23 ../
-rw-------   1 bandit16 bandit16   1675 Apr 19 12:23 key
bandit16@bandit:/tmp/11$ ssh -i key bandit17@localhost -p 2220
Level 17 → Level 18
Level Goal
There are 2 files in the homedirectory: passwords.old and passwords.new. The password for the next level is in passwords.new and is the only line that has been changed between passwords.old and passwords.new
主目录中有2个文件:passwords.old 和 passwords.new。下一级别的密码在 passwords.new 中,是 passwords.old 和 passwords.new 之间唯一被更改的行。
NOTE: if you have solved this level and see ‘Byebye!’ when trying to log into bandit18, this is related to the next level, bandit19
注意:如果您已经解决了这个级别,并在尝试登录到bandit18时看到“再见!”,这与下一个级别bandit19有关
Commands you may need to solve this level
cat, grep, ls, diff
解题过程:
登录17之后,查看目录,发现有两个文件,看提示说,修改过的一行就是密码,用diff命令查看修改过的一行
diff 命令,即 differences,主要用于比较两个文件或者两个文件夹中文件的差异。
常用参数:
| 选项 | 描述 |
|---|---|
| -i | 忽略大小写差异 |
| -w | 忽略所有空格 |
| -B | 忽略空白行 |
| -y | 并排比较文件 |
| -n | 使用RCS格式进行比较 |
| -c | 以C语言风格进行比较 |
bandit17@bandit:~$ ls
passwords.new  passwords.old
bandit17@bandit:~$ diff passwords.new passwords.old
42c42
< hga5tuuCLF6fFzUpnagiMN8ssu9LFrdg
---
> p6ggwdNHncnmCNxuAt0KtKVq185ZU7AW
Level 18 → Level 19
Level Goal
The password for the next level is stored in a file readme in the homedirectory. Unfortunately, someone has modified .bashrc to log you out when you log in with SSH.
下一级别的密码存储在家目录中的 readme 文件中。不幸的是,有人修改了 .bashrc 文件,当您使用 SSH 登录时会将您注销。
Commands you may need to solve this level
ssh, ls, cat
解题过程:
1、用上面的密码,一上了就自动logout了,搞得我一脸懵逼,题目说是.bashrc文件自动登出的。
".bashrc" 是一个每当终端被加载时都会运行的文件。这意味着通过 SSH 登录时,它也会被运行,因为这同样会加载一个终端。
我们在ssh登陆的时候可以直接后面跟上命令,虽然被断开了,但是命令还是可以执行的
SSH不仅允许我们远程登录到一台机器,而且还可以通过在常见的SSH表达式后面添加命令来远程执行命令。
首先,我们使用 ls 确保readme文件在文件夹中,然后我们使用 cat 查看
PS C:\Users\17816> ssh bandit18@bandit.labs.overthewire.org -p2220 ls
                         _                     _ _ _
                        | |__   __ _ _ __   __| (_) |_
                        | '_ \ / _` | '_ \ / _` | | __|
                        | |_) | (_| | | | | (_| | | |_
                        |_.__/ \__,_|_| |_|\__,_|_|\__|


                      This is an OverTheWire game server.
            More information on http://www.overthewire.org/wargames

bandit18@bandit.labs.overthewire.org's password:
readme
PS C:\Users\17816> ssh bandit18@bandit.labs.overthewire.org -p2220 cat readme
                         _                     _ _ _
                        | |__   __ _ _ __   __| (_) |_
                        | '_ \ / _` | '_ \ / _` | | __|
                        | |_) | (_| | | | | (_| | | |_
                        |_.__/ \__,_|_| |_|\__,_|_|\__|


                      This is an OverTheWire game server.
            More information on http://www.overthewire.org/wargames

bandit18@bandit.labs.overthewire.org's password:
awhqfNnAbc1naukrpqDYcF95h7HoMTrC
2、或者,我们可以使用相同的方法通过SSH执行命令,但使用一个命令来生成一个bash shell (/etc/shells文件记录了你当前Linux系统中所支持的shell版本),或者使用允许在目标机器上运行“伪终端”。这样我们就可以运行. 这在我们需要进行多个命令时特别有用,因为我们不需要重复SSH声明和密码。
-T 和 -t: 禁用和启用远程机器上的伪终端的映射。
ssh bandit18@bandit.labs.overthewire.org -p 2220 /bin/bash
ssh bandit18@bandit.labs.overthewire.org -p 2220 -t /bin/sh
PS C:\Users\17816> ssh bandit18@bandit.labs.overthewire.org -p 2220 /bin/bash
                         _                     _ _ _
                        | |__   __ _ _ __   __| (_) |_
                        | '_ \ / _` | '_ \ / _` | | __|
                        | |_) | (_| | | | | (_| | | |_
                        |_.__/ \__,_|_| |_|\__,_|_|\__|


                      This is an OverTheWire game server.
            More information on http://www.overthewire.org/wargames

bandit18@bandit.labs.overthewire.org's password:
ls
readme
cat readme
awhqfNnAbc1naukrpqDYcF95h7HoMTrC
PS C:\Users\17816> ssh bandit18@bandit.labs.overthewire.org -p 2220 -t /bin/sh
                         _                     _ _ _
                        | |__   __ _ _ __   __| (_) |_
                        | '_ \ / _` | '_ \ / _` | | __|
                        | |_) | (_| | | | | (_| | | |_
                        |_.__/ \__,_|_| |_|\__,_|_|\__|


                      This is an OverTheWire game server.
            More information on http://www.overthewire.org/wargames

bandit18@bandit.labs.overthewire.org's password:
$ ls
readme
$ cat readme
awhqfNnAbc1naukrpqDYcF95h7HoMTrC
3、发现还有一种做法使用“bash --norc”参数禁用读取 ~/.bashrc 文件,即不加载 .bashrc 文件
ssh bandit18@bandit.labs.overthewire.org -p 2220 "bash --norc"
Level 19 → Level 20
Level Goal
To gain access to the next level, you should use the setuid binary in the homedirectory. Execute it without arguments to find out how to use it. The password for this level can be found in the usual place (/etc/bandit_pass), after you have used the setuid binary.
要访问下一级别,您应该使用家目录中的setuid二进制文件。执行它而不带参数以找出如何使用它。在使用setuid二进制文件后,可以在通常的位置(/etc/bandit_pass)找到此级别的密码。
解题过程:
1、我们被告知主目录中存在一个二进制文件,它可以以某种方式帮助我们访问 bandit20 的密码。让我们看一下二进制文件
bandit19@bandit:~$ ls
bandit20-do
bandit19@bandit:~$ ls -l
total 16
-rwsr-x--- 1 bandit20 bandit19 14876 Oct  5  2023 bandit20-do
2、当我们列出文件的详细信息时,我们可以看到二进制文件可以由当前用户 (bandit19) 执行(r-x),并且归 bandit20 所有,执行二进制文件表示它只是以另一个用户的身份执行另一个命令
bandit19@bandit:~$ ./bandit20-do
Run a command as another user.
  Example: ./bandit20-do id
3、让我们查看使用 id 命令以其他用户身份运行命令的结果
bandit19@bandit:~$ id
uid=11019(bandit19) gid=11019(bandit19) groups=11019(bandit19)
bandit19@bandit:~$ ./bandit20-do id
uid=11019(bandit19) gid=11019(bandit19) euid=11020(bandit20) groups=11019(bandit19)
4、我们观察到,当我们使用二进制文件时,我们也被分配了 bandit20 的 UID,这意味着我们可以像 bandit20 一样运行命令,我们可以访问 bandit20 用户密码文件,该文件只能由用户 bandit20 读取。
bandit19@bandit:~$ ./bandit20-do cat /etc/bandit_pass/bandit20
VxCazJaVykI6W36BkBU0mJTCM8rR95XT
Level 20 → Level 21
Level Goal
There is a setuid binary in the homedirectory that does the following: it makes a connection to localhost on the port you specify as a commandline argument. It then reads a line of text from the connection and compares it to the password in the previous level (bandit20). If the password is correct, it will transmit the password for the next level (bandit21).
在主目录中有一个 setuid 二进制文件,它会执行以下操作:它会连接到本地主机上您在命令行参数中指定的端口。然后,它会从连接中读取一行文本,并将其与上一级(bandit20)中的密码进行比较。如果密码正确,它将传输下一级(bandit21)的密码。
NOTE: Try connecting to your own network daemon to see if it works as you think
请尝试连接到您自己的网络守护程序,看看是否按您所想的那样工作。
Commands you may need to solve this level
ssh, nc, cat, bash, screen, tmux, Unix ‘job control’ (bg, fg, jobs, &, CTRL-Z, …)
解题过程:
我们有一个二进制文件,可以请求从用户指定的端口读取一行文本。如果文本与上一级的密码相同,我们将获得下一级的密码。
因此,我们需要做的第一项任务是使用 Nc 命令设置监听端口,如果我们使用二进制文件连接到该端口,该端口将返回上一级密码。
bandit20@bandit:~$ ls
suconnect
bandit20@bandit:~$ echo "VxCazJaVykI6W36BkBU0mJTCM8rR95XT" | nc -l -p 1234 &
[1] 405657
-l 标志用于设置侦听器,-p 标志用于指定侦听器应侦听的端口。由于我们尚未指定 IP 地址,因此侦听器将在 localhost 上运行。
命令末尾的“&”用于指定我们希望命令在后台运行。我们可以使用jobs命令查看系统上的所有进程/作业
bandit20@bandit:~$ jobs
[1]+  Running                 echo "VxCazJaVykI6W36BkBU0mJTCM8rR95XT" | nc -l -p 1234 &
现在我们有了监听设置,我们可以使用二进制文件在同一端口上进行连接
bandit20@bandit:~$ ls
suconnect

bandit20@bandit:~$ ./suconnect 1234
Read: VxCazJaVykI6W36BkBU0mJTCM8rR95XT
Password matches, sending next password
NvEJF7oVjkddltPSrdKEFOllh9V1IBcq
[1]+  Done                    echo "VxCazJaVykI6W36BkBU0mJTCM8rR95XT" | nc -l -p 1234
bandit20@bandit:~$
一旦我们连接,就会将上一级的密码与我们在端口 1234 上指定的文本进行比较,并且由于它们匹配,我们得到了下一级的密码
Level 21 → Level 22
Level Goal
A program is running automatically at regular intervals from cron, the time-based job scheduler. Look in /etc/cron.d/ for the configuration and see what command is being executed.
一个程序正在定期从 cron 中自动运行,cron 是基于时间的作业调度程序。在 /etc/cron.d/ 中查找配置,并查看正在执行的命令是什么。
一些有用的材料:
Linux/Mac 教程:Cron Jobs - 如何使用 crontab 调度命令 - YouTube
Linux下的crontab定时执行任务命令详解
Linux crontab 命令帮助和示例
Linux 中的 11 个 Cron 调度任务示例
解题过程:
按照提示到/etc/cron.d目录下查看cronjob_bandit22的定时任务,由于我们需要 bandit22 的密码,我查看了 cronjob 'cronjob_bandit22'
bandit21@bandit:~$ ll /etc/cron.d
total 56
drwxr-xr-x   2 root root  4096 Oct  5  2023 ./
drwxr-xr-x 106 root root 12288 Oct  5  2023 ../
-rw-r--r--   1 root root    62 Oct  5  2023 cronjob_bandit15_root
-rw-r--r--   1 root root    62 Oct  5  2023 cronjob_bandit17_root
-rw-r--r--   1 root root   120 Oct  5  2023 cronjob_bandit22
-rw-r--r--   1 root root   122 Oct  5  2023 cronjob_bandit23
-rw-r--r--   1 root root   120 Oct  5  2023 cronjob_bandit24
-rw-r--r--   1 root root    62 Oct  5  2023 cronjob_bandit25_root
-rw-r--r--   1 root root   201 Jan  8  2022 e2scrub_all
-rwx------   1 root root    52 Oct  5  2023 otw-tmp-dir*
-rw-r--r--   1 root root   102 Mar 23  2022 .placeholder
-rw-r--r--   1 root root   396 Feb  2  2021 sysstat

bandit21@bandit:~$ cat /etc/cron.d/cronjob_bandit22
@reboot bandit22 /usr/bin/cronjob_bandit22.sh &> /dev/null
* * * * * bandit22 /usr/bin/cronjob_bandit22.sh &> /dev/null
当我们查看 bandit22 的 cron 作业时,我们看到每秒钟都会执行一个 shell 脚本
(有关 cron 作业语法的详细信息,请参阅随附的资源)
让我们看一下脚本的内容,并尝试理解它要执行什么
bandit21@bandit:~$ cat /usr/bin/cronjob_bandit22.sh
#!/bin/bash
chmod 644 /tmp/t7O6lds9S0RqQh9aMcz6ShpAoZKF7fgv
cat /etc/bandit_pass/bandit22 > /tmp/t7O6lds9S0RqQh9aMcz6ShpAoZKF7fgv
我们发现他使用chmod向所有人授予读取权限(由最后 4 个表示)。然后将下一级的密码保存到该文件中。/tmp/t7O6lds9S0RqQh9aMcz6ShpAoZKF7fgv
让我们查看文件的内容,得到下一级的密码
bandit21@bandit:~$ cat /tmp/t7O6lds9S0RqQh9aMcz6ShpAoZKF7fgv
WdDozAdTM2z9DiFEQ2mGlwngMfj4EZff
Level 22 → Level 23
Level Goal
A program is running automatically at regular intervals from cron, the time-based job scheduler. Look in /etc/cron.d/ for the configuration and see what command is being executed.
一个程序正在定期从 cron 中自动运行,cron 是基于时间的作业调度程序。在 /etc/cron.d/ 中查找配置,并查看正在执行的命令是什么。
NOTE: Looking at shell scripts written by other people is a very useful skill. The script for this level is intentionally made easy to read. If you are having problems understanding what it does, try executing it to see the debug information it prints.
注意:查看其他人编写的shell脚本是一项非常有用的技能。此级别的脚本故意设计得易于阅读。如果您不明白它的功能,请尝试执行它以查看它打印的调试信息。
解题过程:
既然我们知道 cron 正在执行一项任务,那么让我们看一下系统上的所有 cron 作业
bandit22@bandit:~$ ll /etc/cron.d
total 56
drwxr-xr-x   2 root root  4096 Oct  5  2023 ./
drwxr-xr-x 106 root root 12288 Oct  5  2023 ../
-rw-r--r--   1 root root    62 Oct  5  2023 cronjob_bandit15_root
-rw-r--r--   1 root root    62 Oct  5  2023 cronjob_bandit17_root
-rw-r--r--   1 root root   120 Oct  5  2023 cronjob_bandit22
-rw-r--r--   1 root root   122 Oct  5  2023 cronjob_bandit23
-rw-r--r--   1 root root   120 Oct  5  2023 cronjob_bandit24
-rw-r--r--   1 root root    62 Oct  5  2023 cronjob_bandit25_root
-rw-r--r--   1 root root   201 Jan  8  2022 e2scrub_all
-rwx------   1 root root    52 Oct  5  2023 otw-tmp-dir*
-rw-r--r--   1 root root   102 Mar 23  2022 .placeholder
-rw-r--r--   1 root root   396 Feb  2  2021 sysstat
由于我们需要 bandit23 的密码,因此我们正在寻找的任务应该是cronjob_bandit23
bandit22@bandit:~$ cat /etc/cron.d/cronjob_bandit23
@reboot bandit23 /usr/bin/cronjob_bandit23.sh  &> /dev/null
* * * * * bandit23 /usr/bin/cronjob_bandit23.sh  &> /dev/null
当我们查看 bandit23 的 cron 作业时,我们看到每秒钟都会执行一个 shell 脚本
bandit22@bandit:~$ cat /usr/bin/cronjob_bandit23.sh
#!/bin/bash

myname=$(whoami)
mytarget=$(echo I am user $myname | md5sum | cut -d ' ' -f 1)

echo "Copying passwordfile /etc/bandit_pass/$myname to /tmp/$mytarget"

cat /etc/bandit_pass/$myname > /tmp/$mytarget
让我们逐行分解脚本
- 首先,它使用whoami命令获取当前用户的用户名,并将其存储在变量myname中。
- 然后,它使用echo命令和md5sum命令生成一个MD5哈希值,该哈希值基于字符串"I am user $myname"
- 最后,它使用cut命令提取哈希值的第一个字段(即MD5哈希值本身),并将其存储在变量mytarget中,文件名就是由这一行创建的
- 接下来,它使用echo命令输出一条消息,指示正在将密码文件复制到目标位置。然后,它使用cat命令将密码文件的内容读取并重定向到目标位置/tmp/$mytarget。
所以我们的目标是找到“mytarget”的值。既然我们知道 “myname” 的值是 bandit23,那么让我们试试我们是否能够生成 “mytarget” 的值。
bandit22@bandit:~$ echo I am user bandit23 | md5sum | cut -d ' ' -f 1
8ca319486bfbbc3663ea0fbe81326349
我们得到了脚本为 bandit23 创建的“mytarget”的值。现在我们有了值,让我们获取 bandit23 的密码
bandit22@bandit:~$ cat /tmp/8ca319486bfbbc3663ea0fbe81326349
QYw0Y2aiA672PsMmh9puTQuhoz8SyR2G
Level 23 → Level 24
Level Goal
A program is running automatically at regular intervals from cron, the time-based job scheduler. Look in /etc/cron.d/ for the configuration and see what command is being executed.
程序从基于时间的作业调度程序 cron 定期自动运行。在 /etc/cron.d/ 中查找配置,并查看正在执行的命令是什么。
NOTE: This level requires you to create your own first shell-script. This is a very big step and you should be proud of yourself when you beat this level!
注意:此级别需要您创建自己的第一个shell脚本。这是一个非常重要的步骤,当您通过此级别时,您应该为自己感到自豪!
NOTE 2: Keep in mind that your shell script is removed once executed, so you may want to keep a copy around…
注意2:请记住,一旦执行,您的shell脚本将被删除,因此您可能希望保留一份副本...
解题过程:
和之前一样,先看/etc/cron.d里面的定时任务
bandit23@bandit:~$ ll /etc/cron.d
total 56
drwxr-xr-x   2 root root  4096 Oct  5  2023 ./
drwxr-xr-x 106 root root 12288 Oct  5  2023 ../
-rw-r--r--   1 root root    62 Oct  5  2023 cronjob_bandit15_root
-rw-r--r--   1 root root    62 Oct  5  2023 cronjob_bandit17_root
-rw-r--r--   1 root root   120 Oct  5  2023 cronjob_bandit22
-rw-r--r--   1 root root   122 Oct  5  2023 cronjob_bandit23
-rw-r--r--   1 root root   120 Oct  5  2023 cronjob_bandit24
-rw-r--r--   1 root root    62 Oct  5  2023 cronjob_bandit25_root
-rw-r--r--   1 root root   201 Jan  8  2022 e2scrub_all
-rwx------   1 root root    52 Oct  5  2023 otw-tmp-dir*
-rw-r--r--   1 root root   102 Mar 23  2022 .placeholder
-rw-r--r--   1 root root   396 Feb  2  2021 sysstat

bandit23@bandit:~$ cat /etc/cron.d/cronjob_bandit24
@reboot bandit24 /usr/bin/cronjob_bandit24.sh &> /dev/null
* * * * * bandit24 /usr/bin/cronjob_bandit24.sh &> /dev/null
让我们看一下脚本的内容,并尝试理解它试图执行什么
bandit23@bandit:~$ cat /usr/bin/cronjob_bandit24.sh
#!/bin/bash

myname=$(whoami)

cd /var/spool/$myname/foo
echo "Executing and deleting all scripts in /var/spool/$myname/foo:"
for i in * .*;
do
    if [ "$i" != "." -a "$i" != ".." ];
    then
        echo "Handling $i"
        owner="$(stat --format "%U" ./$i)"
        if [ "${owner}" = "bandit23" ]; then
            timeout -s 9 60 ./$i
        fi
        rm -f ./$i
    fi
done
该脚本的功能是执行/var/spool/bandit24中的所有文件,如果60秒内没有执行就删除所有脚本文件.
- 首先,它使用
whoami命令获取当前用户的用户名,并将其存储在变量myname中。 - 然后,它切换到目录
/var/spool/$myname/foo,其中$myname是之前获取的用户名。 - 接下来,它输出一条消息,指示正在执行和删除该目录下的所有脚本文件。
- 然后,它使用
for循环遍历目录中的每个文件和子目录。对于每个文件或子目录,它会检查其名称是否为 "." 或 "..",如果不是,则继续处理。 - 在处理每个文件时,它首先使用
stat命令获取文件的所有者,并将其存储在变量owner中。 - 然后进行检查当前所选文件的所有者是否为“bandit23”。如果是,则执行当前选定的文件,并在等待 60 秒后发送 KILL 信号,然后删除(timeout 命令中的 -s 标志用于指定要发送到命令的信号 “9” 是 KILL 命令的别名)
- 最后,无论文件是否被执行,它都会使用
rm -f命令删除该文件。
因此,从中我们了解到,保存在文件夹“bandit24”中的任何文件都会被执行,如果文件是由“bandit23”创建的,那么在执行 60 秒后,该文件将被删除。如果我们想要“bandit24”的密码,我们需要编写一个将从 bandit24 文件夹执行的脚本。我们编写的脚本应该获取密码并将其保存在我们可以访问的位置(目录)/tmp
让我们在目录中创建一个文件夹,并将其用作今后所有操作的基本位置。 /tmp
bandit23@bandit:~$ mkdir /tmp/kkk

bandit23@bandit:~$ cd /tmp/kkk
vim pass.sh 进入vim编辑模式输入脚本,写入:
#! /bin/bash
cat /etc/bandit_pass/bandit24 > /tmp/kkk/password
由于脚本的输出将保存在一个名为password的文件中,因此让我们也创建一个具有该名称的文件。
touch password
cron 作业由用户 bandit24 执行,因此当执行我们的脚本时,它还将具有 bandit24 的权限,这与我们拥有的权限不同,因此,当脚本尝试将输出写入名为“password”的文件时,它将失败,所以让我们更改当前文件夹中所有文件的权限,以便任何用户都可以访问它们。
chmod 777 -R /tmp/kkk
最后,让我们将脚本复制到应该执行我们文件的 cron 作业所在的文件夹中。/var/spool/bandit24/foo
bandit23@bandit:/tmp/kkk$ cp pass.sh /var/spool/bandit24/foo/

等待大约一分钟后,我们应该看到一些数据已写入密码文件。让我们查看此文件的内容
bandit23@bandit:/tmp/kkk$ cat password
VAfGXJ1PBSsPSnvsjI8p759leLZ9GGar
Level 24 → Level 25
Level Goal
A daemon is listening on port 30002 and will give you the password for bandit25 if given the password for bandit24 and a secret numeric 4-digit pincode. There is no way to retrieve the pincode except by going through all of the 10000 combinations, called brute-forcing.
一个守护程序正在监听端口30002,如果提供了bandit24的密码和一个秘密的4位数字密码,它将给你bandit25的密码。除了通过遍历所有10000个组合(称为暴力破解)外,没有其他方法可以检索到这个密码。
You do not need to create new connections each time
每次都不需要创建新连接。
一些有用的材料:
Bash For 循环 |Linux化 (linuxize.com)
解题过程:
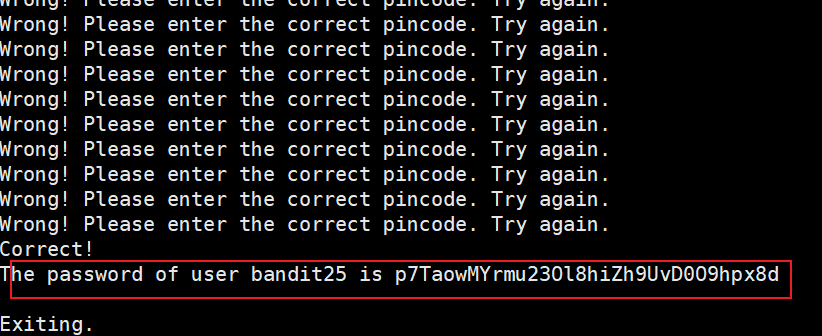
从这个问题中,我们了解到有一个服务在端口 30002 上运行,并且它使用 4 位 PIN 进行身份验证。如果我们可以验证自己的身份并向服务提交 bandit24 的密码,我们将获得 bandit25 的密码。
由于我们不知道 PIN,因此找到正确 PIN 的唯一方法是暴力破解。暴力破解只不过是尝试一个字段的所有可能的组合,直到找到正确的组合。
让我们使用 Netcat 连接到守护程序,看看返回的结果是什么。

我们看到我们需要在一行中输入bandit24用户的密码和秘密验证码,用空格分隔。
现在我们知道了必须将数据提交到服务的格式,让我们使用循环编写一个简单的暴力破解器,该循环尝试了位于 0000 和 9999 之间的所有数字。最后使用管道运算符将暴力破解器的结果发送到 Netcat。Netcat 将尝试所有组合,并在找到正确的 PIN 值时将下一级别的密码返回给我们
#! /bin/bash
for i in {0000..9999};
do
        echo "VAfGXJ1PBSsPSnvsjI8p759leLZ9GGar $i";
done | nc localhost 30002
现在脚本已经编程好了,我们需要保存它。我创建了一个文件夹并将脚本保存在其中(请记住使其可执行)
bandit24@bandit:/$ mkdir /tmp/bandit25
bandit24@bandit:/$ cd /tmp/bandit25
bandit24@bandit:/tmp/bandit25$ vim 1.sh
bandit24@bandit:/tmp/bandit25$ chmod u+x 1.sh
接下来我们运行脚本,成功获得密码
The password of user bandit25 is p7TaowMYrmu23Ol8hiZh9UvD0O9hpx8d
Level 25 → Level 26
Level Goal
Logging in to bandit26 from bandit25 should be fairly easy… The shell for user bandit26 is not /bin/bash, but something else. Find out what it is, how it works and how to break out of it.
从bandit25登录到bandit26应该相当容易...用户bandit26的shell不是/bin/bash,而是其他东西。找出它是什么,它是如何工作的,以及如何打破它。
解题过程:
我们看到我们有 bandit26 的 SSH 密钥,让我们使用 SSH 并登录到下一个级别。
bandit25@bandit:~$ ls
bandit26.sshkey
bandit25@bandit:~$ ssh -i bandit26.sshkey bandit26@localhost -p 2220
在查看输出时,看起来我们确实连接到了 bandit26,但我们立即被注销了。在问题中,我们被告知 bandit26 的默认 shell 不是“/bin/bash”,所以让我们找出正在使用的 shell。
“/etc/passwd”文件包含有关设备上用户的信息以及每个用户正在使用的 shell。
cat /etc/passwd
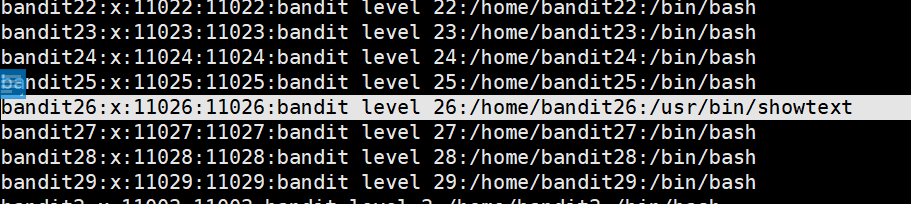
我们看到 bandit26 正在使用一个名为“/usr/bin/showtext”的 shell。让我们看一下这个“showtext”shell的内容
bandit25@bandit:~$ cat /usr/bin/showtext
#!/bin/sh

export TERM=linux

exec more ~/text.txt
exit 0
这里export TERM=linux是设置终端类型是linux,然后使用more命令查看用户主目录下的text.txt文件,之后直接exit 0退出了,所以我们ssh才连接不上去!
这里要想办法,从这个shell的配置看,有一个more给我们用,所以我们把终端缩小一点,这个时候more不会结束
bandit25@bandit:~$ ssh -i bandit26.sshkey bandit26@localhost -p2220
正如预期的那样,由于内容无法适应我们的终端,因此进入了交互模式。然后我们按v,进入编辑模式,
我们可以收集到使用“set shell”命令,我们可以更改用户的shell,并且通过调用“shell”,用户应该被加载到指定的shell中。
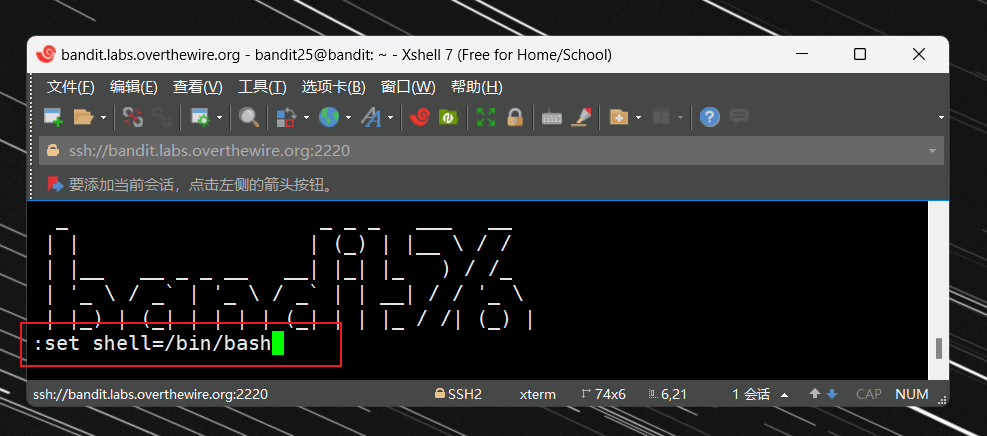
注意:一旦输入这个命令,我们将进入插入模式,所以按“Esc”键退出插入模式并输入下一个命令。
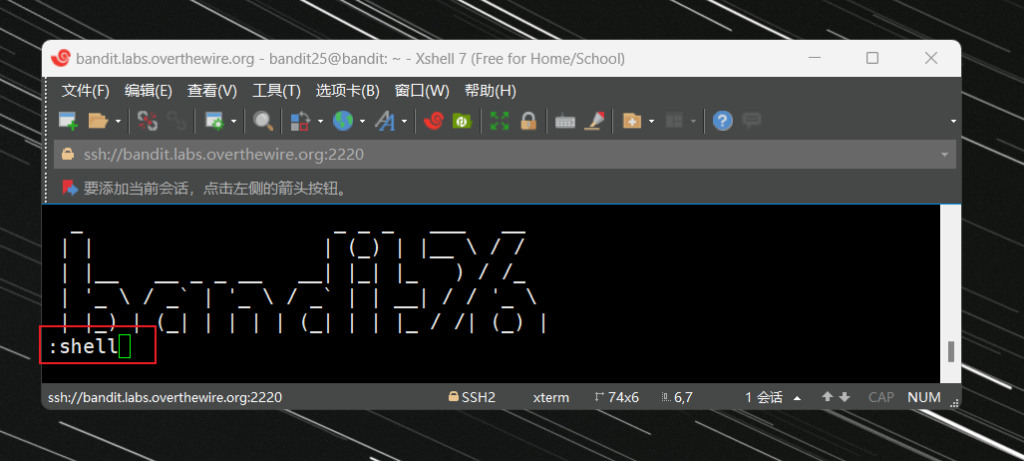
正如我们将看到的,我们已经启动了 bash shell 并以 bandit26 的身份登录。让我们查看bandit26 的密码,以便稍后在需要时使用它。
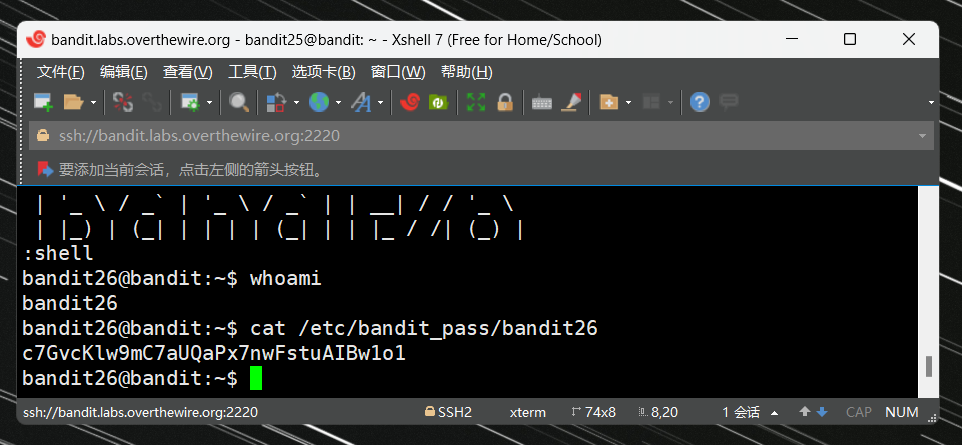
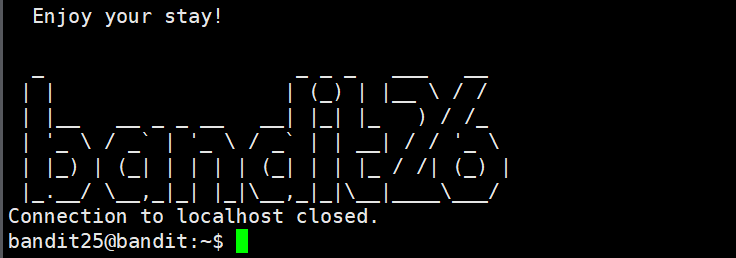
  _                     _ _ _   ___   __
 | |                   | (_) | |__ \ / /
 | |__   __ _ _ __   __| |_| |_   ) / /_
 | '_ \ / _` | '_ \ / _` | | __| / / '_ \
 | |_) | (_| | | | | (_| | | |_ / /| (_) |
:shell
bandit26@bandit:~$ whoami
bandit26
bandit26@bandit:~$ cat /etc/bandit_pass/bandit26
c7GvcKlw9mC7aUQaPx7nwFstuAIBw1o1
注1:建议在此之后立即完成下一关,因为您已经以 bandit26 的身份登录,如果现在注销,那么您必须重复与上述相同的步骤才能再次登录 bandit26。
注2:如果注销,请记住,您必须注销两次,一次从 bandit26 注销,一次从 bandit25 注销。当尝试返回 bandit25 时,您将以插入模式结束 Vim,使用 Esc 退出插入模式并进入退出 Vim,现在更多应该打开,再次按 q 退出更多。
Level 26 → Level 27
Level Goal
Good job getting a shell! Now hurry and grab the password for bandit27!
做得好,已经拿到了 shell!现在赶快获取 bandit27 的密码!
解题过程:
我们看到一个名为“bandit27-do”的二进制文件。如果我们查看其属性,我们会看到该文件归 bandit27 所有。这意味着使用二进制文件,如果我们运行任何其他命令,该命令将具有与二进制文件所有者相同的权限(在这种情况下,命令将具有 bandit27 权限)
bandit26@bandit:~$ ls
bandit27-do  text.txt
bandit26@bandit:~$ ls -l
total 20
-rwsr-x--- 1 bandit27 bandit26 14876 Oct  5  2023 bandit27-do
-rw-r----- 1 bandit26 bandit26   258 Oct  5  2023 text.txt
bandit26@bandit:~$ cat text.txt
  _                     _ _ _   ___   __
 | |                   | (_) | |__ \ / /
 | |__   __ _ _ __   __| |_| |_   ) / /_
 | '_ \ / _` | '_ \ / _` | | __| / / '_ \
 | |_) | (_| | | | | (_| | | |_ / /| (_) |
 |_.__/ \__,_|_| |_|\__,_|_|\__|____\___/
因此,让我们尝试使用二进制文件来读取 bandit27 的密码文件的内容。
bandit26@bandit:~$ ./bandit27-do cat /etc/bandit_pass/bandit27
YnQpBuifNMas1hcUFk70ZmqkhUU2EuaS
Level 26 - Level 34
Level 27 → Level 28
Level Goal
There is a git repository at ssh://bandit27-git@localhost/home/bandit27-git/repo via the port 2220. The password for the user bandit27-git is the same as for the user bandit27.
有一个git存储库在 ssh://bandit27-git@localhost/home/bandit27-git/repo 通过端口 2220 。用户 bandit27-git 的密码与用户 bandit27 的密码相同。
Clone the repository and find the password for the next level.
克隆存储库并找到下一级别的密码。
一些有用的材料:
关于 Git - GitHub 文档
版本控制 (Git)
一点点理论:
“Git 是一个免费和开源的分布式版本控制系统”——https://git-scm.com/。它允许您保存代码,以及对代码所做的历史记录和更改。它还使在同一代码上的协作和团队合作变得更加简单。
Git 系统包含很多命令。一些最重要的命令是:
- git init,以创建新的 Git 存储库/项目
- git clone,以复制现有 Git 存储库
- git push,更新远程存储库
- git pull,从远程存储库获取更新 也可以使用具有 GUI 的 Git 客户端,以便于交互 (https://git-scm.com/downloads/guis)。
不同的服务为您提供了一种远程托管存储库(公共或私有)的方法。如果你对开源感兴趣,这些通常也是获取软件或做出贡献的地方。非常有名的是 Github 和 GitLab。
“.git”目录包含版本控制所需的所有信息。它包含有关提交、远程存储库地址、日志等的信息。
README 文件通常位于 git 存储库中。它用作目录或 git 项目中所有文件的概述。创建 git 项目时,README 文件有助于记住项目的内容,以及用户和开发人员可能需要的其他信息。例如,项目、配置和安装说明、许可信息等的简短说明。
解题过程:
从这个问题中,我们了解到在这个级别上我们将使用 Git。在克隆存储库之前,让我们在/tmp中创建一个文件夹,因为从前面的一些级别中,我们知道我们只有适当的权限才能将文件保存在文件夹中。
bandit27@bandit:~$ mkdir /tmp/git
bandit27@bandit:~$ cd /tmp/git
bandit27@bandit:/tmp/git$
现在我们已经创建了工作目录,让我们克隆存储库。注意端口2220
bandit27@bandit:/tmp/git$ git clone ssh://bandit27-git@localhost:2220/home/bandit27-git/repo
Cloning into 'repo'...
The authenticity of host '[localhost]:2220 ([127.0.0.1]:2220)' can't be established.
ED25519 key fingerprint is SHA256:C2ihUBV7ihnV1wUXRb4RrEcLfXC5CXlhmAAM/urerLY.
This key is not known by any other names
Are you sure you want to continue connecting (yes/no/[fingerprint])? yes
Could not create directory '/home/bandit27/.ssh' (Permission denied).
Failed to add the host to the list of known hosts (/home/bandit27/.ssh/known_hosts).
                         _                     _ _ _
                        | |__   __ _ _ __   __| (_) |_
                        | '_ \ / _` | '_ \ / _` | | __|
                        | |_) | (_| | | | | (_| | | |_
                        |_.__/ \__,_|_| |_|\__,_|_|\__|


                      This is an OverTheWire game server.
            More information on http://www.overthewire.org/wargames

bandit27-git@localhost's password:
remote: Enumerating objects: 3, done.
remote: Counting objects: 100% (3/3), done.
remote: Compressing objects: 100% (2/2), done.
remote: Total 3 (delta 0), reused 0 (delta 0), pack-reused 0
Receiving objects: 100% (3/3), done.
将出现密码提示。只需输入 bandit 27 的密码,存储库就会被克隆。现在让我们来看看它。
bandit27@bandit:/tmp/git$ ls
repo
bandit27@bandit:/tmp/git$ cd repo/
bandit27@bandit:/tmp/git/repo$ ls -la
total 16
drwxrwxr-x 3 bandit27 bandit27 4096 Apr 22 08:26 .
drwxrwxr-x 3 bandit27 bandit27 4096 Apr 22 08:26 ..
drwxrwxr-x 8 bandit27 bandit27 4096 Apr 22 08:26 .git
-rw-rw-r-- 1 bandit27 bandit27   68 Apr 22 08:26 README
我们看到“.git”目录和通用的“README”文件。让我们看一下这个文件的内容。
bandit27@bandit:/tmp/git/repo$ cat README
The password to the next level is: AVanL161y9rsbcJIsFHuw35rjaOM19nR
Level 28 → Level 29
Level Goal
There is a git repository at ssh://bandit28-git@localhost/home/bandit28-git/repo via the port 2220. The password for the user bandit28-git is the same as for the user bandit28.
有一个git存储库在 ssh://bandit28-git@localhost/home/bandit28-git/repo 通过端口 2220 。用户 bandit28-git 的密码与用户 bandit28 的密码相同。
Clone the repository and find the password for the next level.
克隆存储库并找到下一级别的密码。
一点点理论:
对于此级别,我们需要知道两个额外的命令:
- git log,向我们显示提交日志。
- git show <commit>,查看特定提交 (commit) 的详细信息的命令(创建公共存储库时,请务必了解您推送到它的信息,因为更改和以前的版本被保存。因此,敏感数据(如密码)仍然可以检索)
解题过程:
和上一题一样,继续用git把repo克隆到本地
bandit28@bandit:~$ cd /tmp/
bandit28@bandit:/tmp$ mkdir Git
bandit28@bandit:/tmp$ cd Git
bandit28@bandit:/tmp/Git$ git clone  ssh://bandit28-git@localhost:2220/home/bandit28-git/repo
Cloning into 'repo'...
The authenticity of host '[localhost]:2220 ([127.0.0.1]:2220)' can't be established.
ED25519 key fingerprint is SHA256:C2ihUBV7ihnV1wUXRb4RrEcLfXC5CXlhmAAM/urerLY.
This key is not known by any other names
Are you sure you want to continue connecting (yes/no/[fingerprint])? yes
Could not create directory '/home/bandit28/.ssh' (Permission denied).
Failed to add the host to the list of known hosts (/home/bandit28/.ssh/known_hosts).
                         _                     _ _ _
                        | |__   __ _ _ __   __| (_) |_
                        | '_ \ / _` | '_ \ / _` | | __|
                        | |_) | (_| | | | | (_| | | |_
                        |_.__/ \__,_|_| |_|\__,_|_|\__|


                      This is an OverTheWire game server.
            More information on http://www.overthewire.org/wargames

bandit28-git@localhost's password:
remote: Enumerating objects: 9, done.
remote: Counting objects: 100% (9/9), done.
remote: Compressing objects: 100% (6/6), done.
remote: Total 9 (delta 2), reused 0 (delta 0), pack-reused 0
Receiving objects: 100% (9/9), done.
Resolving deltas: 100% (2/2), done.
现在,我们已经将存储库克隆到我们的机器上。让我们看看存储库中存在哪些文件。
bandit28@bandit:/tmp/Git$ ls
repo
bandit28@bandit:/tmp/Git$ cd repo/
bandit28@bandit:/tmp/Git/repo$  ll
total 16
drwxrwxr-x 3 bandit28 bandit28 4096 Apr 22 08:40 ./
drwxrwxr-x 3 bandit28 bandit28 4096 Apr 22 08:40 ../
drwxrwxr-x 8 bandit28 bandit28 4096 Apr 22 08:40 .git/
-rw-rw-r-- 1 bandit28 bandit28  111 Apr 22 08:40 README.md
我们看到文件夹中有一个名为“README.md”的文件。让我们看一下这个文件的内容。
bandit28@bandit:/tmp/Git/repo$ cat README.md
# Bandit Notes
Some notes for level29 of bandit.

## credentials

- username: bandit29
- password: xxxxxxxxxx
看起来在 README.md 文件中,bandit29 的密码被屏蔽了。有可能在之前的某个提交中,密码以明文形式存在。让我们查看一下这个仓库的提交日志。

从上到下为由新到旧,我们发现最新一条日志写着fix info leak,修复信息泄露,那么我们就git show,默认是有git diff-tree --cc的格式,可以看到文本差异。
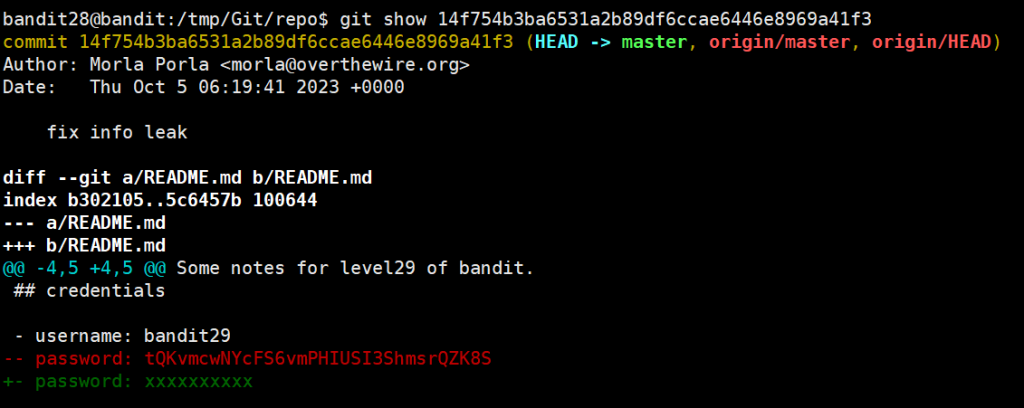
可以看到密码为:tQKvmcwNYcFS6vmPHIUSI3ShmsrQZK8S
Level 29 → Level 30
Level Goal
There is a git repository at ssh://bandit29-git@localhost/home/bandit29-git/repo via the port 2220. The password for the user bandit29-git is the same as for the user bandit29.
有一个git存储库在 ssh://bandit29-git@localhost/home/bandit29-git/repo 通过端口 2220 。用户 bandit29-git 的密码与用户 bandit29 的密码相同。
Clone the repository and find the password for the next level.
克隆存储库并找到下一级别的密码。
一点点理论:
Git 分支是版本控制系统的另一个特性。它允许您将开发拆分为不同的分支。具体来说,有一个主分支,可以从中获取软件,并且可以单独处理。您可以更改和添加功能,同时仍保持工作主分支。工作完成后,可以再次将其集成到 master 分支中。这允许额外的版本控制。您可以为生产分支提供可用的软件,同时修复错误或在不同的开发分支中添加功能。
- git branch是一个用于查看和管理Git分支的命令
- 查看本地分支:使用git branch命令可以列出本地所有的分支。当前活跃的分支通常会在前面标有星号(*)或加粗显示,以便于识别。
- 查看远程分支:通过添加
-r选项,即git branch -r,可以列出所有跟踪的远程分支。 - 查看所有分支:如果想要同时查看本地和远程所有分支,可以使用git branch -a命令。
- git checkout <branch_name>:切换到指定的分支,并将工作目录更新为该分支的最新提交。如果当前工作目录中有未提交的更改,Git通常会阻止切换,以避免数据丢失。如果你想强制切换分支并丢弃未提交的修改,可以使用git checkout -f 或 git checkout -m命令。
解题过程:
还是和之前一样,继续用git把repo克隆到本地
bandit29@bandit:~$ mkdir /tmp/ban29
bandit29@bandit:/$ cd /tmp/ban29
bandit29@bandit:/tmp/ban29$ git clone ssh://bandit29-git@localhost:2220/home/bandit29-git/repo
bandit29@bandit:/tmp/ban29$ ls
repo
bandit29@bandit:/tmp/ban29$ cd repo/
bandit29@bandit:/tmp/ban29/repo$ ll
total 16
drwxrwxr-x 3 bandit29 bandit29 4096 Apr 23 00:49 ./
drwxrwxr-x 3 bandit29 bandit29 4096 Apr 23 00:49 ../
drwxrwxr-x 8 bandit29 bandit29 4096 Apr 23 00:49 .git/
-rw-rw-r-- 1 bandit29 bandit29  131 Apr 23 00:49 README.md
bandit29@bandit:/tmp/ban29/repo$ cat README.md
# Bandit Notes
Some notes for bandit30 of bandit.

## credentials

- username: bandit30
- password: <no passwords in production!>
这道题还是老套路,克隆下来,然后git log、git show都试了一下,也没啥发现,如果我们仔细查看“生产环境中无密码”这条消息,我们就会理解到,这是给我们一个线索,告诉我们在哪里可以找到密码。Git可以创建分支。所以如果生产是一个分支,那么可能存在另一个用于开发目的的分支,其中包含密码。
我们可以使用git branch -a来查看git中存在的所有分支。
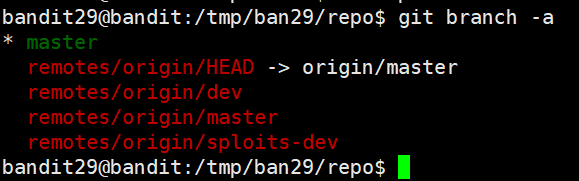
如果我们切换到开发分支,一般dev是development开发者的分支,则可以在 README.md 文件中找到密码
bandit29@bandit:/tmp/ban29/repo$ git checkout remotes/origin/dev
bandit29@bandit:/tmp/ban29/repo$ ls
code  README.md
bandit29@bandit:/tmp/ban29/repo$ cat README.md
# Bandit Notes
Some notes for bandit30 of bandit.

## credentials

- username: bandit30
- password: xbhV3HpNGlTIdnjUrdAlPzc2L6y9EOnS
Level 30 → Level 31
级别目标
ssh://bandit30-git@localhost/home/bandit30-git/repo 上有一个 git 存储库。用户 bandit30-git 的密码与用户 bandit30 的密码相同。
克隆存储库并查找下一级别的密码。
解题过程:
还是和之前一样
bandit30@bandit:~$ mkdir /tmp/ban30
bandit30@bandit:~$ cd /tmp/ban30
bandit30@bandit:/tmp/ban30$ git clone ssh://bandit30-git@localhost:2220/home/bandit30-git/repo
bandit30@bandit:/tmp/ban30$ ls
repo
bandit30@bandit:/tmp/ban30$ cd repo/
bandit30@bandit:/tmp/ban30/repo$ ll
total 16
drwxrwxr-x 3 bandit30 bandit30 4096 Apr 23 01:33 ./
drwxrwxr-x 3 bandit30 bandit30 4096 Apr 23 01:33 ../
drwxrwxr-x 8 bandit30 bandit30 4096 Apr 23 01:33 .git/
-rw-rw-r-- 1 bandit30 bandit30   30 Apr 23 01:33 README.md
bandit30@bandit:/tmp/ban30/repo$ cat README.md
just an epmty file... muahaha
看起来文件是空的,这次我们没有得到任何线索。让我们看看此存储库中是否有可用的分支。
bandit30@bandit:/tmp/ban30/repo$ git branch -a
* master
  remotes/origin/HEAD -> origin/master
  remotes/origin/master
发现没有可用的东西
Git 还有另一个功能,叫做标签。它们用于标记存储库版本历史记录中重要的特定点。让我们看看我们是否能找到任何线索。
bandit30@bandit:/tmp/ban30/repo$ git tag
secret
我们看到有一个secret标签,让我们看看他的内容,发现下一关密码
bandit30@bandit:/tmp/ban30/repo$ git show secret
OoffzGDlzhAlerFJ2cAiz1D41JW1Mhmt
Level 31 → Level 32
Level Goal
There is a git repository at via the port . The password for the user is the same as for the user .
ssh://bandit31-git@localhost/home/bandit31-git/repo2220bandit31-gitbandit3
Clone the repository and find the password for the next level.
一点点理论:
- Git Commit:
- 功能:保存当前所做的更改,并创建一个包含这些更改的新提交。
- 描述:提交时,会显示一条描述这些更改的消息。这有助于记录改动内容。
-a标志:该标志确保所有已修改或删除的文件都已暂存(即准备被提交)。通常需要先使用git add命令将这些文件添加到暂存区。
- Git Push:
- 功能:将本地仓库的更改更新到远程仓库。
- 描述:当你有新的提交并且想要将这些更改共享到如GitHub这样的远程仓库时,你会使用git push命令。
-u标志:在第一次推送时使用,它设置一个上游分支,这样以后的推送可以使用简化的命令git push。
- Git Ignore:
- 功能:指定哪些文件或文件模式不应该被Git跟踪。
- 描述:.gitignore文件包含了Git应该忽略的文件名或扩展名列表。这对于排除编译生成的文件、依赖文件或其他不应该包含在版本控制中的文件非常有用。
- 通配符:可以使用通配符来匹配多个文件,例如*.pyc会匹配所有以.pyc结尾的文件。
- Git Add:
- 功能:指定哪些文件将成为下一次提交的一部分。
- 描述:通过git add命令,你可以选择性地将更改的文件加入到暂存区。
-f标志:强制添加通常会被忽略的文件到暂存区,即使它们在.gitignore文件中被指定为忽略。
总结:
- git commit用于保存工作并创建新的提交历史。
- git push用于将本地提交推送到远程仓库。
- .gitignore文件用于指定不应该被Git跟踪的文件。
- git add用于将更改的文件添加到暂存区,以便在下一次提交中包含这些更改。
解题过程:
还是老样子
bandit31@bandit:~$ mkdir /tmp/ban31
bandit31@bandit:~$ cd /tmp/ban31
bandit31@bandit:/tmp/ban31$ git clone ssh://bandit31-git@localhost:2220/home/bandit31-git/repo
bandit31@bandit:/tmp/ban31$ ls
repo
bandit31@bandit:/tmp/ban31$ cd repo/
bandit31@bandit:/tmp/ban31/repo$ ll
total 20
drwxrwxr-x 3 bandit31 bandit31 4096 Apr 23 01:55 ./
drwxrwxr-x 3 bandit31 bandit31 4096 Apr 23 01:55 ../
drwxrwxr-x 8 bandit31 bandit31 4096 Apr 23 01:55 .git/
-rw-rw-r-- 1 bandit31 bandit31    6 Apr 23 01:55 .gitignore
-rw-rw-r-- 1 bandit31 bandit31  147 Apr 23 01:55 README.md
我们发现多了一个.gitigonre文件,这个文件用来告诉 git 哪些文件不应该被添加到仓库中。这在后面会很有用,所以请记住这一点
bandit31@bandit:/tmp/ban31/repo$ cat README.md
This time your task is to push a file to the remote repository.

Details:
    File name: key.txt
    Content: 'May I come in?'
    Branch: master
“README”指出我们的任务是将一个文件推送到远程仓库。因此,我们先创建文件:
bandit31@bandit:/tmp/ban31/repo$ echo "May I come in?" > key.txt
bandit31@bandit:/tmp/ban31/repo$ ll
total 24
drwxrwxr-x 3 bandit31 bandit31 4096 Apr 23 02:02 ./
drwxrwxr-x 3 bandit31 bandit31 4096 Apr 23 01:55 ../
drwxrwxr-x 8 bandit31 bandit31 4096 Apr 23 01:55 .git/
-rw-rw-r-- 1 bandit31 bandit31    6 Apr 23 01:55 .gitignore
-rw-rw-r-- 1 bandit31 bandit31   15 Apr 23 02:02 key.txt
-rw-rw-r-- 1 bandit31 bandit31  147 Apr 23 01:55 README.md
bandit31@bandit:/tmp/ban31/repo$ cat key.txt
May I come in?
我们已按照说明中指定的文件创建了文件。现在让我们看一下存储库中存在的“.gitignore”文件。
bandit31@bandit:/tmp/ban31/repo$ cat .gitignore
*.txt
我们看到文件中写着*.txt,这意味着如果在存储库文件夹中创建了任何带有“.txt”扩展名的文件,它不应该被视为存储库的一部分。所以如果我们尝试添加我们创建的新文件,它将不会被推送到远程存储库。
要成功推送,需要电子邮件和姓名。让我们来配置它们。
git config user.name "bandit31-git"
git config user.email bandit31-git@mail.com
我们使用 git add -f 强制将文件添加到 Git 仓库中。然后git commit -m 'key.txt'提交到本地仓库,最后push到远程origin master
bandit31@bandit:/tmp/ban31/repo$ git add -f key.txt
bandit31@bandit:/tmp/ban31/repo$ git commit -m 'key.txt'
[master 53aa87a] key.txt
 1 file changed, 1 insertion(+)
 create mode 100644 key.txt
bandit31@bandit:/tmp/ban31/repo$ git push origin master
。。。。。
remote: ### Attempting to validate files... ####
remote:
remote: .oOo.oOo.oOo.oOo.oOo.oOo.oOo.oOo.oOo.oOo.
remote:
remote: Well done! Here is the password for the next level:
remote: rmCBvG56y58BXzv98yZGdO7ATVL5dW8y
remote:
remote: .oOo.oOo.oOo.oOo.oOo.oOo.oOo.oOo.oOo.oOo.
remote:
。。。。。
Level 32 → Level 33
After all this git stuff its time for another escape. Good luck!
题目没读懂,可能是git终于完了的意思
解题过程:
我在这个关卡上卡了一段时间。但在稍微搜索了一下之后,我找到了一个非常好的通关攻略。所以使用同样的技巧:
首先我们要了解变量“$0”,这个变量保存了正在执行的文件/脚本的名称。让我们通过一个例子来看看这个。
直接登录发现是一个特别的shell:
WELCOME TO THE UPPERCASE SHELL
>> ls
sh: 1: LS: Permission denied
>> man
sh: 1: MAN: Permission denied
>> whoami
sh: 1: WHOAMI: Permission denied
>> exit
sh: 1: EXIT: Permission denied
>>
当我们尝试运行任何命令时,我们看到命令被转换为大写,所以我们收到一个错误,显示“找不到命令”
Comments 1 条评论
这是一条私密评论